
Hi guys,
So here is the story. As many of you know, The Retrofit Source online: headlight upgrades for all applications sells a nice projector kit called the Morimoto Mini H1, which makes retrofitting quite attainable for the masses. They are currently on their 3rd revision of this product, and about to debut with a 4th, which features yet more improvements. A couple weeks ago I ordered the kit, and for some reason, they sent me revision 2, instead of 3. They have agreed to take the kit back, and ship me revision 4 when it comes out in the coming days. I do have to pay shipping to ship the stuff out, but they will pay for the shipping of the new set. Doesn't seem fair to me that I have to pay for shipping back to them when they did the order incorrectly, but that's another story.
Anyways, since I have to send a shipment back to them, i've decided in the meantime while they prepare revision 4 for sale, that I would order a bunch of shrouds, test fit them, and return whatever I don't want back with my set of mini h1's.
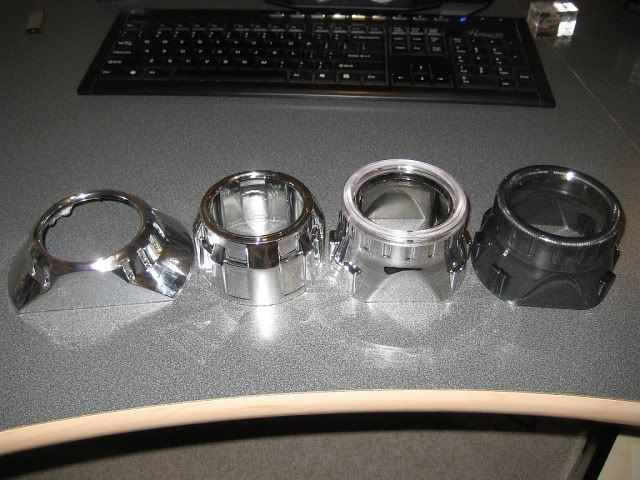
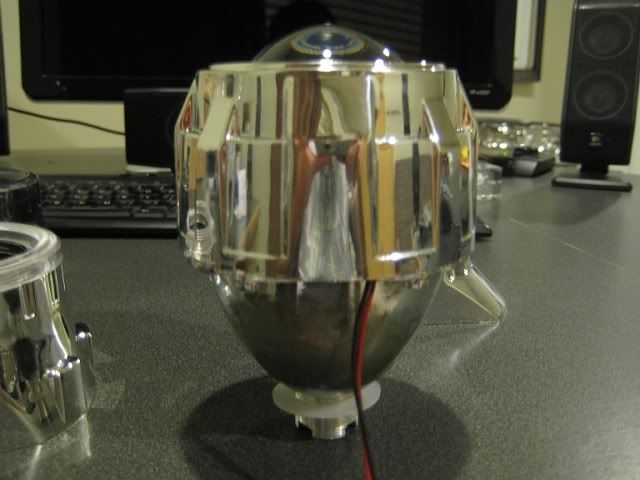
Here are my findings. We have 4 shrouds under review today.
1) The "Mini Gatling Gun." This is what most people choose with their order. It is a design specific for the morimoto mini h1 (and mini d2s, but not 100% sure on that) and comes free in the kit. Note: It is different in size, appearance, and installation procedure from the "Gatling Gun" and "Gatling Gun 2.0" premium shrouds that TRS sells.
2) The mini "graphite gray" shroud. This is an optional shroud that mini h1 buyers can opt for, to receive for free instead of the Mini Gatling gun.
3) Chrome version of the "graphite gray" shroud. This is not a product that TRS actually sells, but they do have them available very rarely if you ask over the phone. They only had 1 in stock when i placed my order, and even then they said that they just get them once in a blue moon by accident, and it is not their intention to have this product in stock. This product is actually entirely different in construction and installation from the graphite gray shroud, despite having similar outward appearances.
4) E-46-R. A replica of what certain BMW's have. Note, this is very different from e-46 R extended.
![Image]()
![Image]()
![Image]()
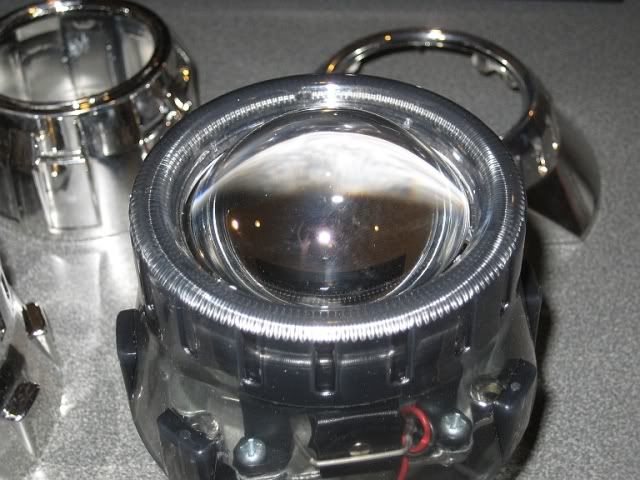
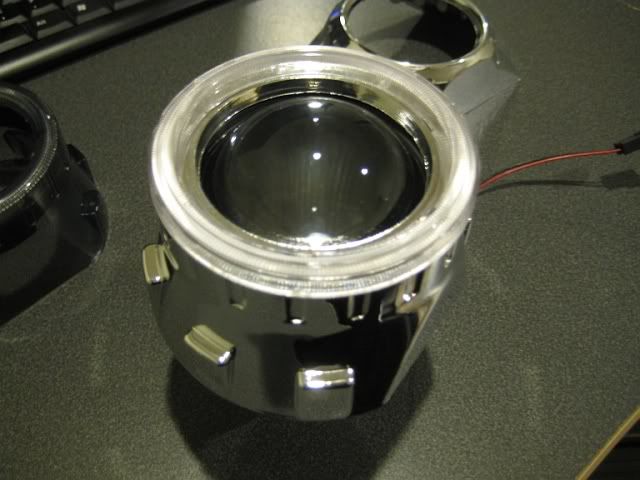
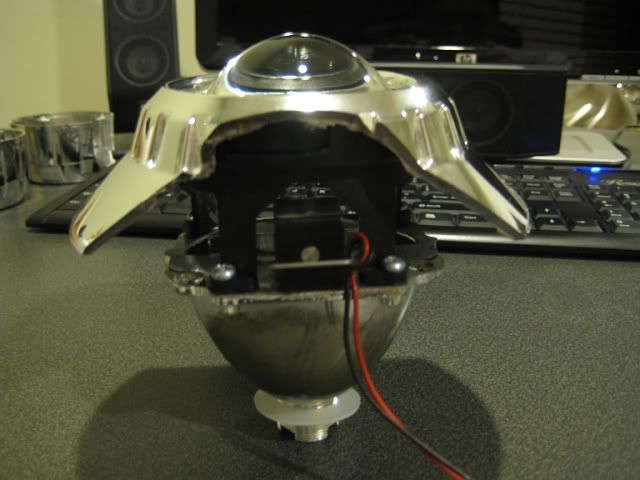
Okay so first up,
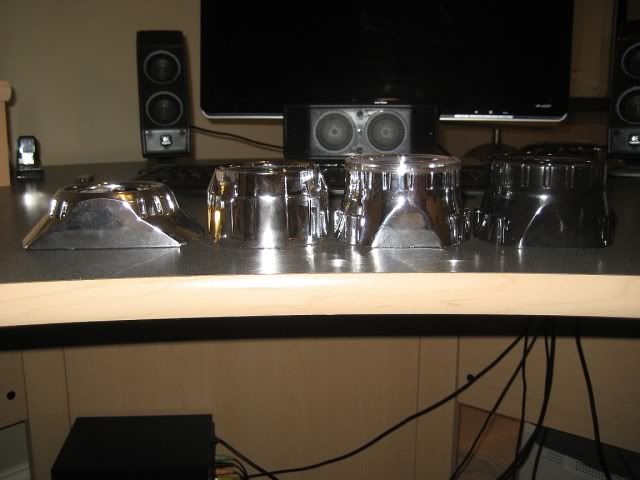
Mini Gatling gun shroud:
![Image]()
![Image]()
![Image]()
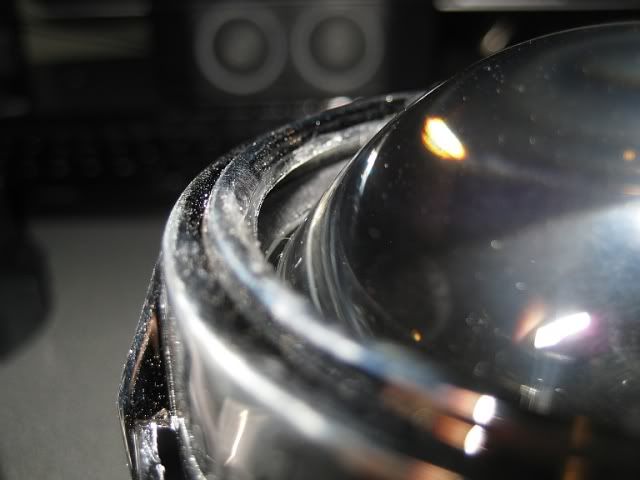
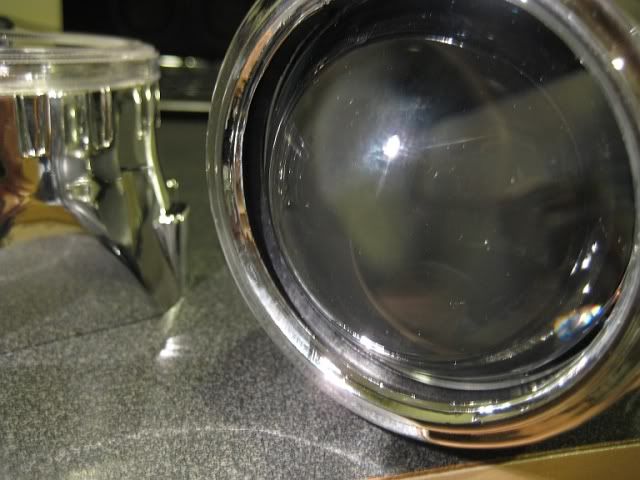
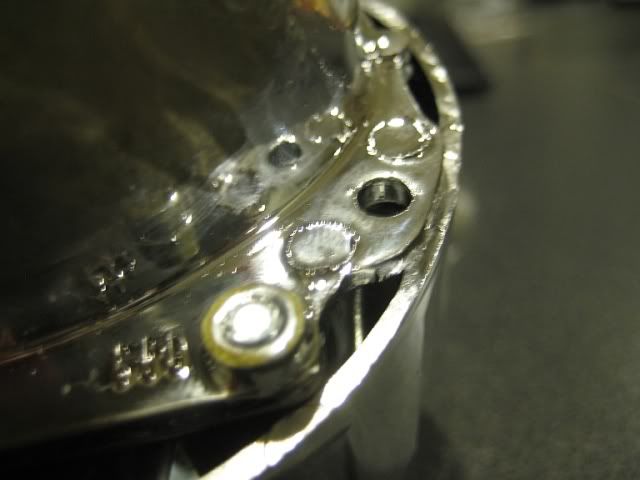
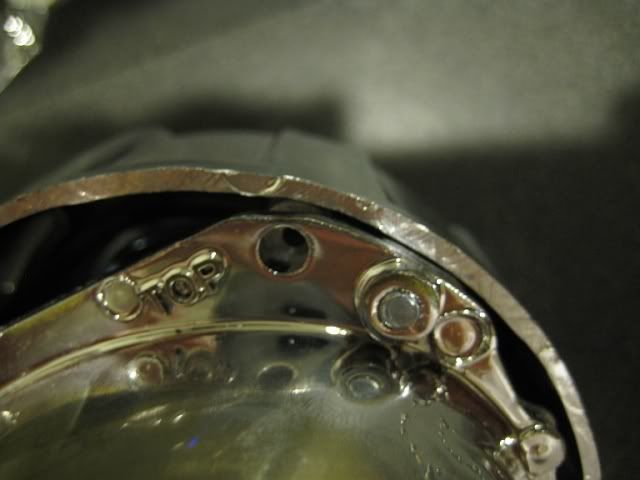
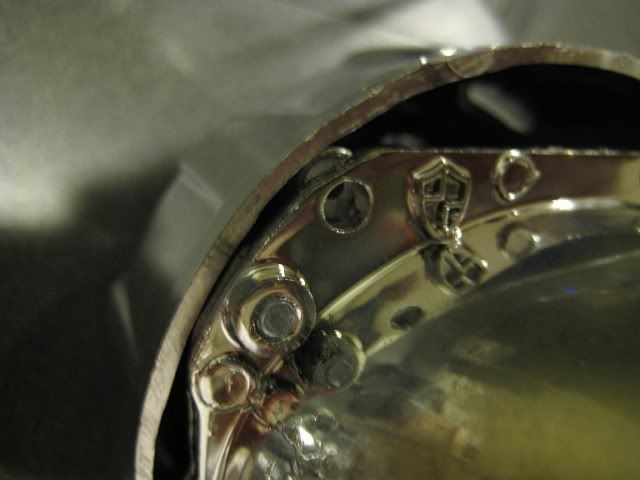
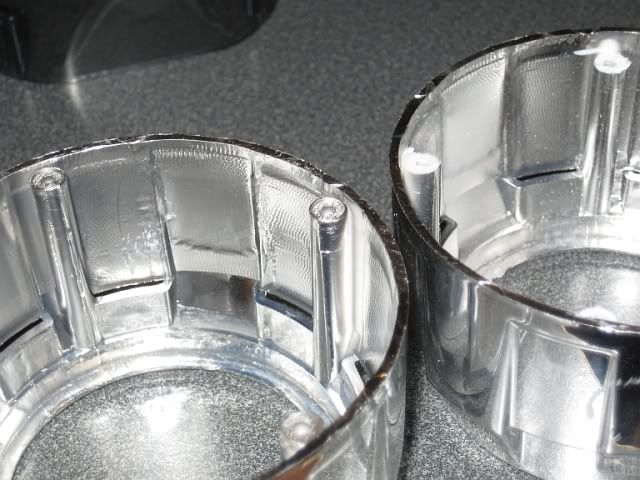
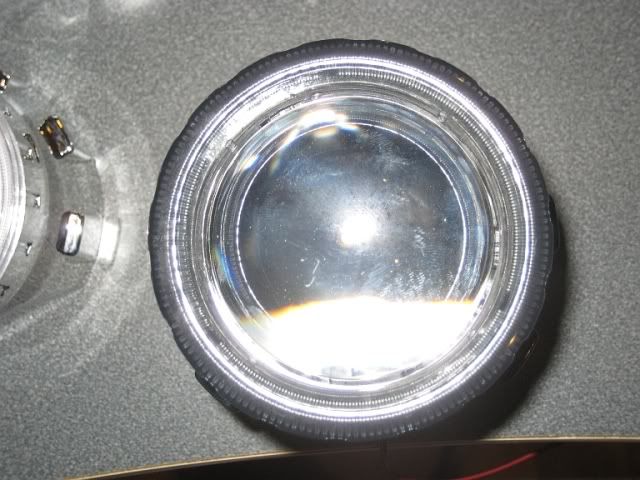
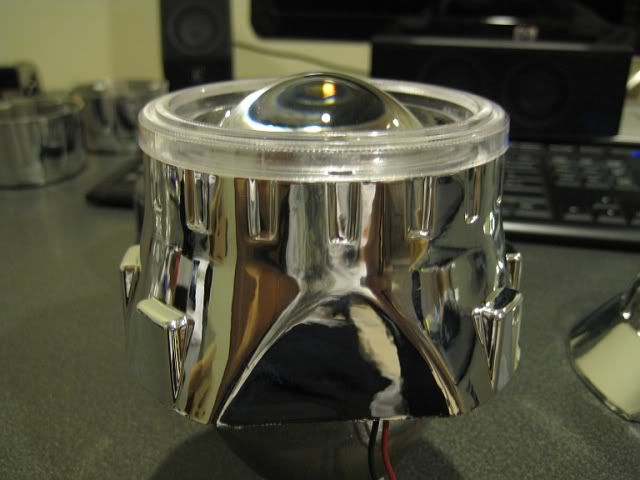
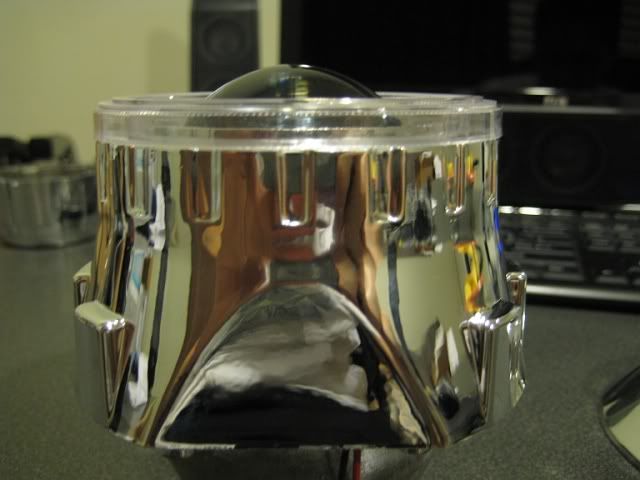
In these second and third pictures, I am trying to show how the shroud has left space between the black lens holder and the chromed shroud. This is due to 2 reasons:
1: Shroud may need modification for projector bowl to be compatible.
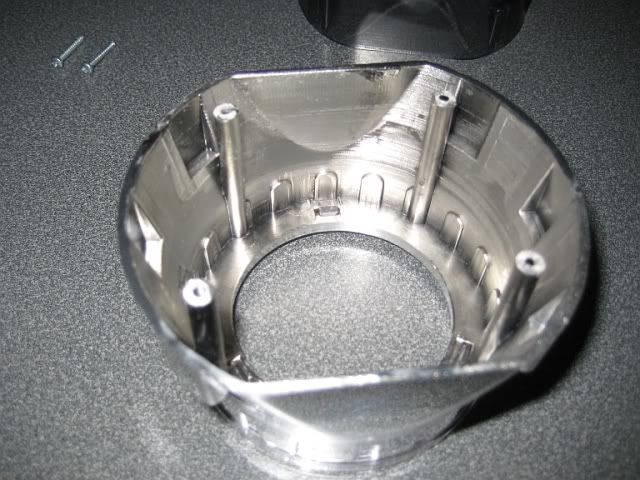
Earlier versions of the shroud attached by way of 3 clips on the inside that would click into the lens holder. It did have a proper orientation, so once on it was supposed to hold on quite well, but in reality, most people had to add silicone or epoxy of some sort to really make a reliable way of attaching it. And that makes it difficult to disassemble the projector in the future. People who didn't glue it had complained that when removing it, that some of these tabs would snap. Not good. The current version that is being sold screws into 4 posts. This is very sturdy, and reversible, but due to imprecision in the casting, sometimes the projector bowl and the shroud don't line up very well. See pictures of how 2 out of the 4 flanges can't be fully mated.
![Image]()
![Image]()
![Image]()
![Image]()
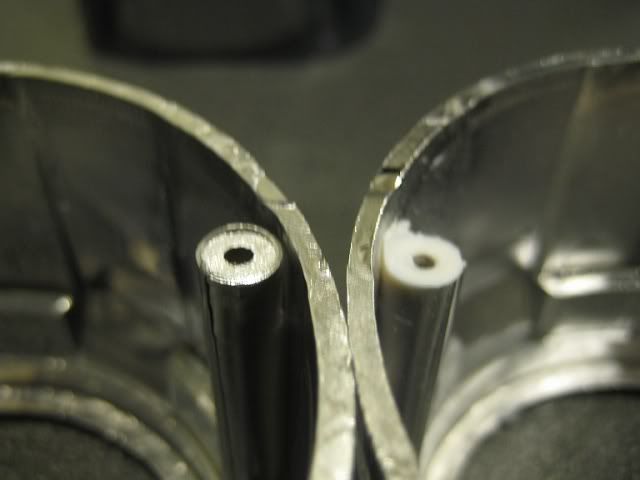
On one projector, I was able to get around this by squeezing the shroud, and it flexed enough that i could fit it around the projector bowl flanges. On the other one though, the flanges were just too big and would need minor trimming if i were keeping these.
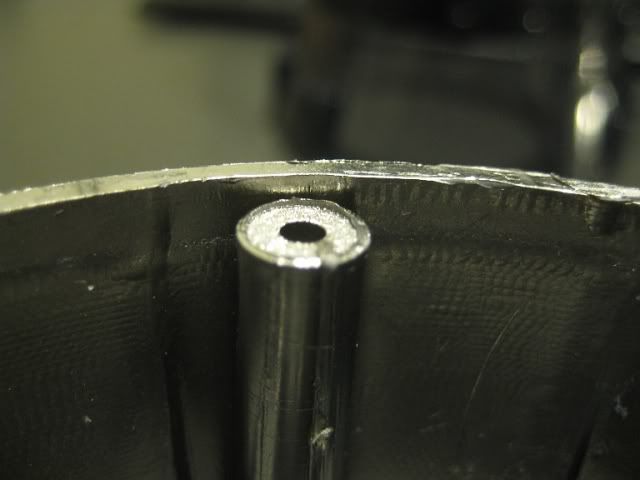
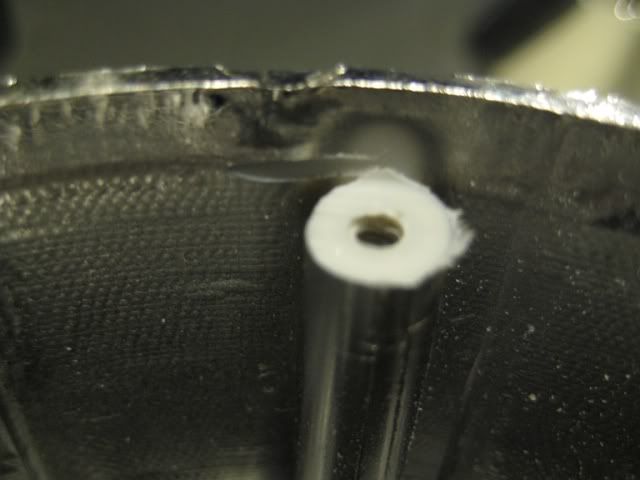
Now, even with that solved, you will still have some space between the mini gatling gun shroud and the lens holder. To truly fix this, you need to trim down the posts inside the shroud that the screws attach to. It only requires a little, but be patient with that dremel, as they can do a little of damage to both you and the shroud in a hurry. I used a reinforced disk and it work well.
Some comparison pics between an unmodified mini gatling gun shroud and a modified one.
![Image]()
![Image]()
![Image]()
Notice the little "line" going in a ring? Try to trim the post to be just at the line, or a little below it.
![Image]()
Okay, now your mini gatling gun shroud should be fully compatible with your morimoto mini h1 projector, however if you plan on installing it in your 6th gen headlights with this particular shroud., the bottom of the shroud will need trimming. There is a top and bottom to the shroud due to how the posts are spaced out. When trimming, try to only cut out the bottom biggest hump, and don't "connect" the bottom most 2 "vents"..All i can say is try to minimize trimming and test fit often. In a worst case scenario, the mini gatling shrouds are only $7.50 each, and shipping is only $3.50. Also, shipping is free for any orders over 30 bucks. So don't stress too much!
Now, onto the mini graphite shrouds.
![Image]()
![Image]()
![Image]()
Okay what can I say...Their transparency notwithstanding, these shrouds are much better! They don't have any screws and posts to attach with, but rather, they are very compatible with the shroud centric rings that TRS sells. For some reason, i don't believe that TRS includes the shroud centric rings with the purchase, but they will throw them in for $5 bucks with your order if you ask over the phone. The rings are the black band near the top of the shroud. They make the shroud stay on super snugly, no silicone or glue required. Also, the shroud does an excellent job of being flush with the projector lens, and it conceals the lens holder perfectly. The only downside is that it will need some thorough dremeling to fit into a 6th gen accord headlight. From the top view, you can see the ring is more substantial than the mini gatling gun, which is nice, but problematic with the fairly small reflector buckets in our headlights.
In any other headlight though, and with some paint, i'd highly recommend them for ease of use and excellent compatibility. Also, I've read that they give off a pretty cool illuminated effect if left unpainted! Something to think about")
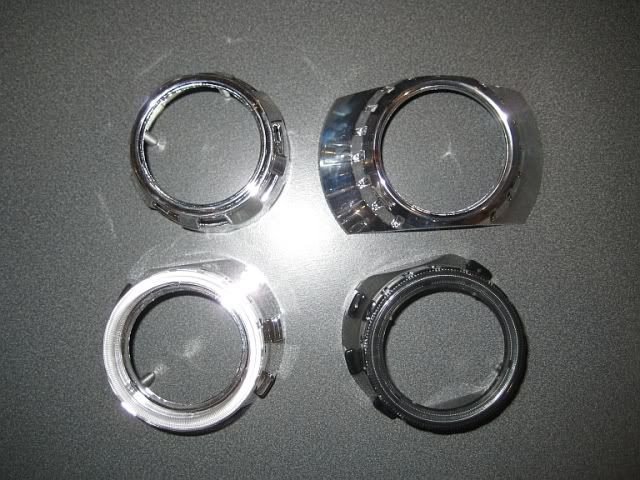
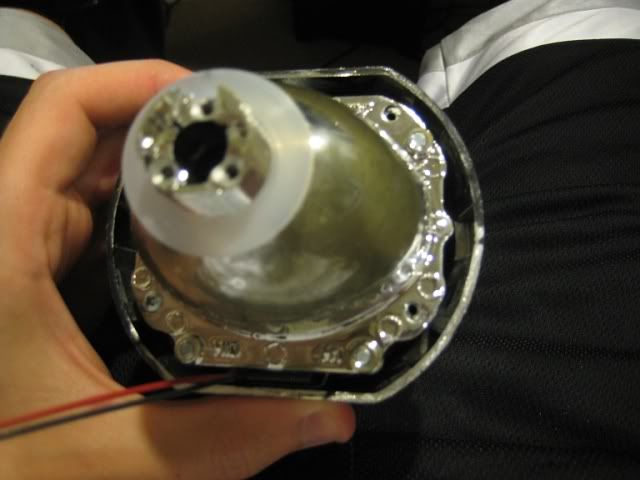
Next is the elusive chrome version of the graphite shroud. Not sure if it's worth covering in detail since it is not available for sale through TRS on a regular basis..
![Image]()
![Image]()
![Image]()
![Image]()
![Image]()
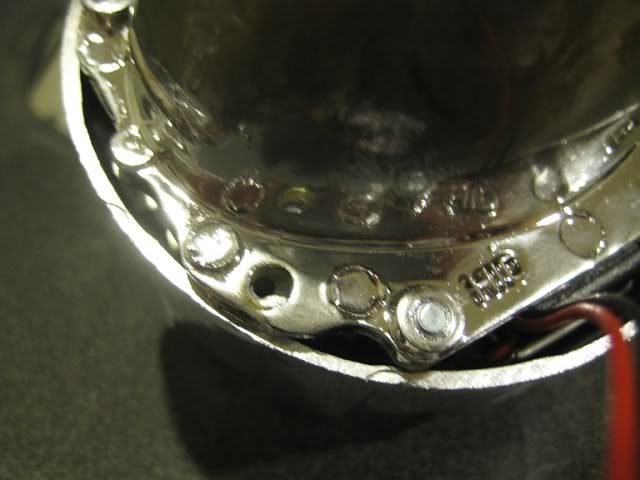
The shroud has 4 mounting posts like the mini gatling gun, but because it is a slightly larger shroud, there is no flange fitment issues to speak of. Also of note is that the shroud has a separate clear ring on top, which is intended for "angel eye" effects. There is a small hole at the bottom of backside of the angel eye to insert an LED, very cool. Also, the angel eye can be easily removed and reattached for custom painting projects.
The mini gatling gun, graphite gray shroud, and the angel eye/chrome version of the graphite gray shroud, are all geared towards the morimoto mini h1. Being that the mini h1 is an open projector, the shrouds all fully enclose the open space between the projector bowl and the lens.
I also purchased 1 value version of the e46 r (again, over the phone, since their website doesn't allow to order just 1 shroud at a time, only pairs). This shroud is not compatible at all with the morimoto mini h1, according to TRS. If you go to TRS's website, under shrouds, under shroud centric rings, under compatibility, you will find it says
Projectors
FX-R, Morimoto Mini H1, Morimoto Mini D2S
TRS Shrouds:
Apollo, E46-R Extended, Ocular, E55-R, GTi-R
So as you see, the non extended version of the e-46 replica is not compatible at all. I would not recommend this to others, but I was able to achieve good compatibility by taking a shroud centric ring, notching it, cutting it, trimming a cross-section out of it, and installing it into the shroud backwards (normally you slip the ring onto the projector first). Siliconing the centric ring to the shroud would be good too and will be my next step. Now that i have practiced cutting up a single value version of the e-46-r, i'll probably get a full set of full quality versions, will trim those, and transfer my centric rings to them. Even then, it won't be attached to the projector quite as sturdy as it is with screws or using centric rings between normally compatible stuff. Nonetheless, I think it makes for a nicer looking end product, so i'm going with that. If you are handy and creative i'm sure you can figure it out too.
And yes, I am using the flat bottom part as the top, and trimmed the hell out of the shroud to use it as the bottom. This is specifically for best results with 6th gen headlights.
![Image]()
![Image]()
![Image]()
Also, note how the e-46 is not as long of a shroud. I will have to use aluminum tape to close off the open space between the projector bowl and the lens holder to keep too much light from escaping. Not sure how well it will hold up to heat though.
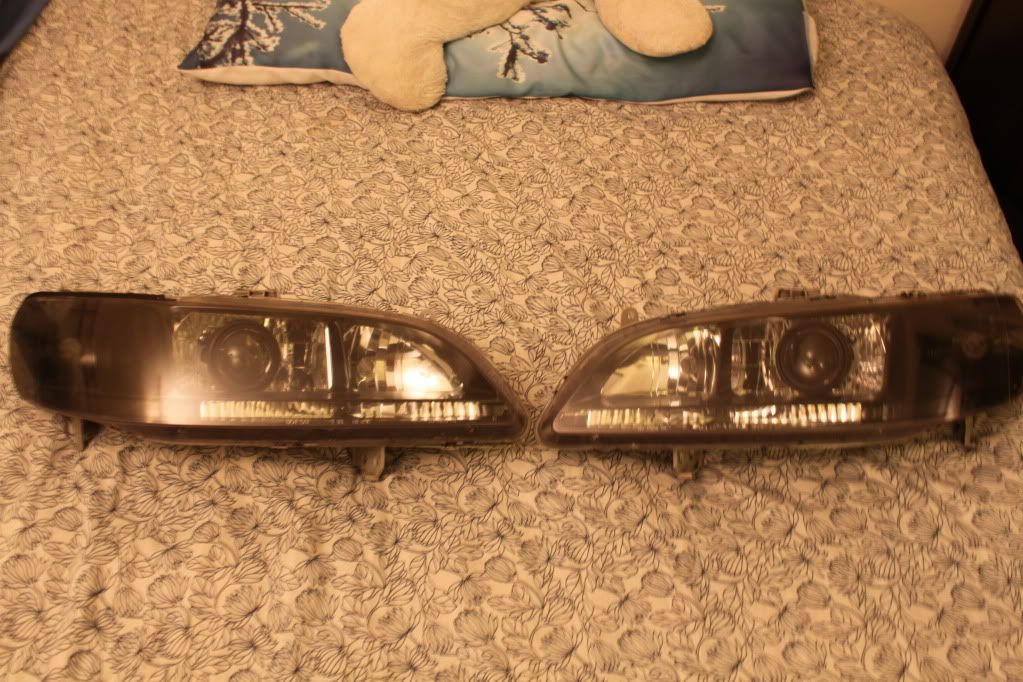
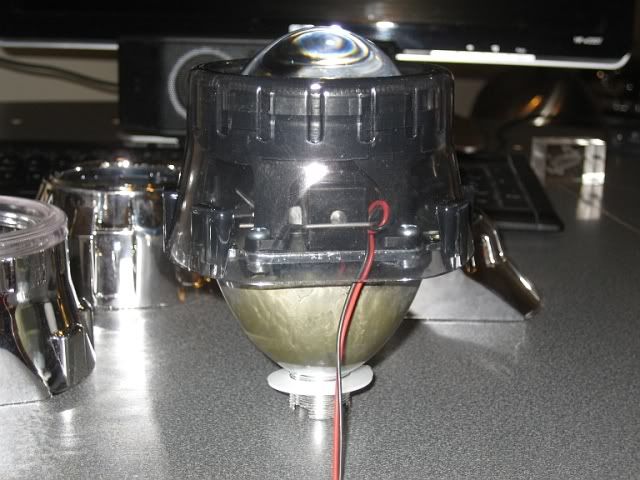
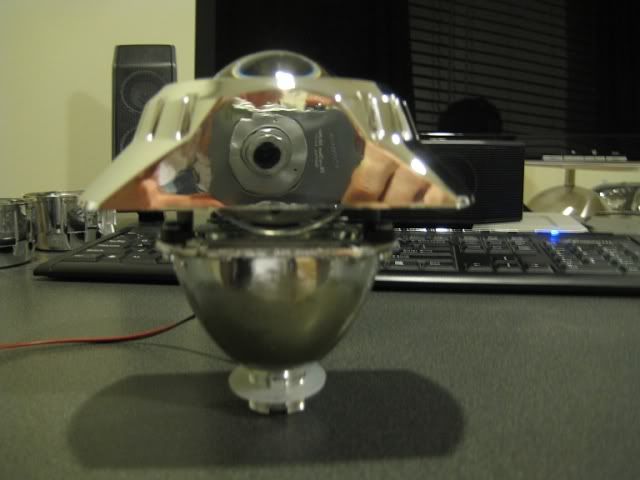
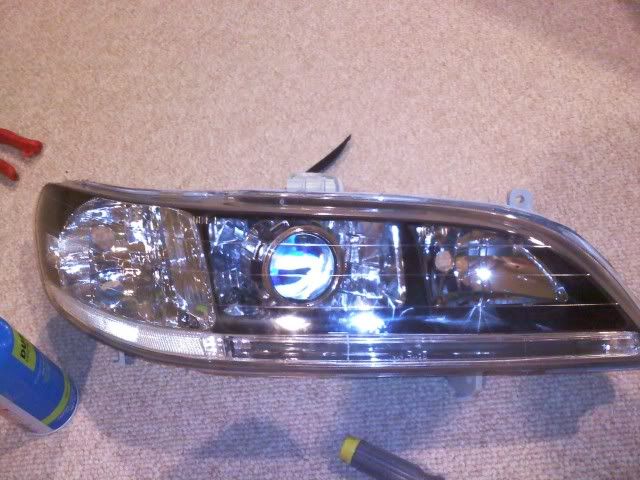
A picture of the mini gatling gun being test fitted (sorry for blurry pictures, these next 2 were with my cell phone, and note, the headlight does not have its bottom chrome parking light reflector installed at the time of pictures):
![Image]()
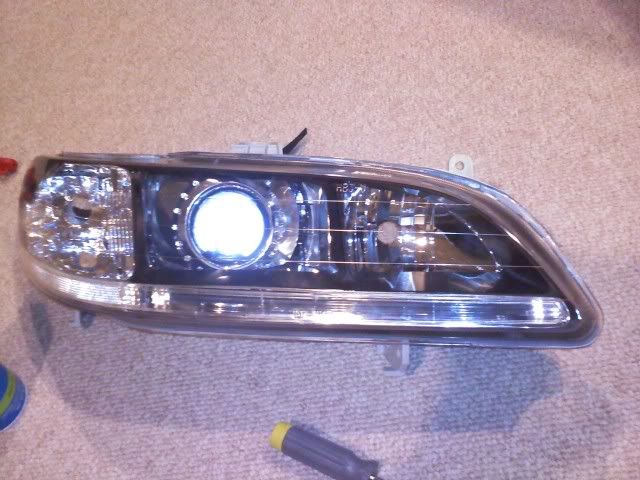
A picture of e46 shroud being test fitted.
![Image]()
This ^ is a preview of how my finished retro's will look.
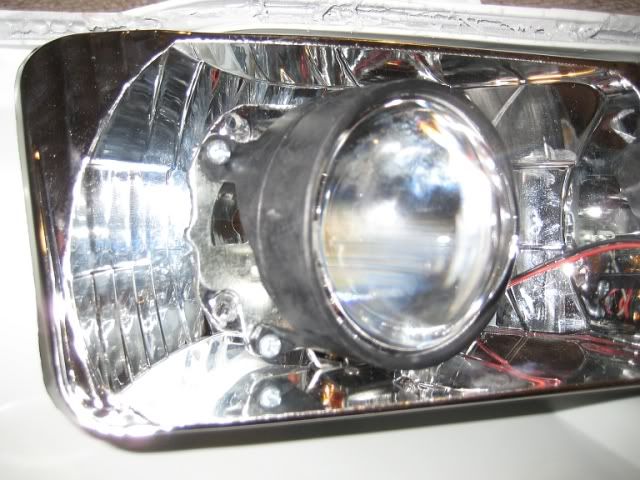
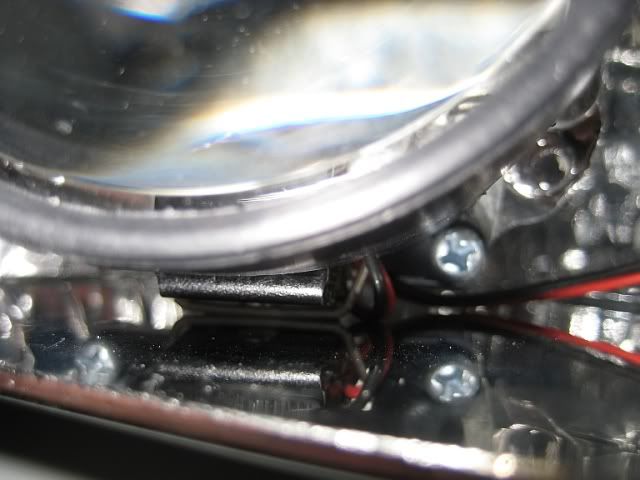
Also, not sure where in my guide i should include these pictures, but pay attention to how snug the bottom of the projector assembly is to the reflector housing, at least on my depo headlights. This helps to show why shrouds that extend far back enough to cover the solenoid will need trimming on the bottom. In fact, I don't believe that there are any shrouds at all at this time that do not require trimming on the bottom.
![Image]()
![Image]()
Also, after further review and measuring, I would advise against Apollo shrouds or E55 Benz shrouds. This user used the appollo shrouds and although there was clearance after trimming the bottom, a good portion of the lends holder is left exposed because the shroud must be slid back far enough to not interfere with the "blackhouse" trim. I personally do not like this appearance when used with a 6th gen accord headlight, but your preference may vary.
http://www.6thgenaccord.com/forums/showthread.php?t=31166&highlight=mini+h1
The E55 shroud has a similarly cylindrical shape, as opposed to have the sloped profile of the e46, so it also would stick out too far into where the headlight lens and blackhouse trim would be. The ocular should be considered, if you can get past the 2 tone texturing of it.
Thank you for your time in reading this, I hope it was of use to you.
For more information on installing mini h1's into 6th gens, check out these threads.
http://www.v6performance.net/forums...ums/6th-generation-honda-accord-1998-2002/208877-morimoto-mini-h1-retrofit.html
http://www.6thgenaccord.com/forums/showthread.php?t=29234
http://www.6thgenaccord.com/forums/showthread.php?t=30914&highlight=mini+h1
6th Generation 2002 Honda Accord V6 Mini H1 Retrofit Completed!!
http://www.6thgenaccord.com/forums/showthread.php?t=31166&highlight=mini+h1
http://www.6thgenaccord.com/forums/showthread.php?t=34744
http://www.v6performance.net/forums...onda-accord-1998-2002/210393-mh1-gen6-headlights-e46-shroud-dont-agree-lol.html
These don't use Mini h1's, but they might be some good inspiration for how you may choose to blackhouse yours, what to do with strips at bottom, etc.
HID ILLUSIONZ - THE HID RETROFIT SPECIALIST
Well, hope I don't get in trouble for posting to links from other websites, and happy retrofitting!!
So here is the story. As many of you know, The Retrofit Source online: headlight upgrades for all applications sells a nice projector kit called the Morimoto Mini H1, which makes retrofitting quite attainable for the masses. They are currently on their 3rd revision of this product, and about to debut with a 4th, which features yet more improvements. A couple weeks ago I ordered the kit, and for some reason, they sent me revision 2, instead of 3. They have agreed to take the kit back, and ship me revision 4 when it comes out in the coming days. I do have to pay shipping to ship the stuff out, but they will pay for the shipping of the new set. Doesn't seem fair to me that I have to pay for shipping back to them when they did the order incorrectly, but that's another story.
Anyways, since I have to send a shipment back to them, i've decided in the meantime while they prepare revision 4 for sale, that I would order a bunch of shrouds, test fit them, and return whatever I don't want back with my set of mini h1's.
Here are my findings. We have 4 shrouds under review today.
1) The "Mini Gatling Gun." This is what most people choose with their order. It is a design specific for the morimoto mini h1 (and mini d2s, but not 100% sure on that) and comes free in the kit. Note: It is different in size, appearance, and installation procedure from the "Gatling Gun" and "Gatling Gun 2.0" premium shrouds that TRS sells.
2) The mini "graphite gray" shroud. This is an optional shroud that mini h1 buyers can opt for, to receive for free instead of the Mini Gatling gun.
3) Chrome version of the "graphite gray" shroud. This is not a product that TRS actually sells, but they do have them available very rarely if you ask over the phone. They only had 1 in stock when i placed my order, and even then they said that they just get them once in a blue moon by accident, and it is not their intention to have this product in stock. This product is actually entirely different in construction and installation from the graphite gray shroud, despite having similar outward appearances.
4) E-46-R. A replica of what certain BMW's have. Note, this is very different from e-46 R extended.
Okay so first up,
Mini Gatling gun shroud:
In these second and third pictures, I am trying to show how the shroud has left space between the black lens holder and the chromed shroud. This is due to 2 reasons:
1: Shroud may need modification for projector bowl to be compatible.
Earlier versions of the shroud attached by way of 3 clips on the inside that would click into the lens holder. It did have a proper orientation, so once on it was supposed to hold on quite well, but in reality, most people had to add silicone or epoxy of some sort to really make a reliable way of attaching it. And that makes it difficult to disassemble the projector in the future. People who didn't glue it had complained that when removing it, that some of these tabs would snap. Not good. The current version that is being sold screws into 4 posts. This is very sturdy, and reversible, but due to imprecision in the casting, sometimes the projector bowl and the shroud don't line up very well. See pictures of how 2 out of the 4 flanges can't be fully mated.
On one projector, I was able to get around this by squeezing the shroud, and it flexed enough that i could fit it around the projector bowl flanges. On the other one though, the flanges were just too big and would need minor trimming if i were keeping these.
Now, even with that solved, you will still have some space between the mini gatling gun shroud and the lens holder. To truly fix this, you need to trim down the posts inside the shroud that the screws attach to. It only requires a little, but be patient with that dremel, as they can do a little of damage to both you and the shroud in a hurry. I used a reinforced disk and it work well.
Some comparison pics between an unmodified mini gatling gun shroud and a modified one.
Notice the little "line" going in a ring? Try to trim the post to be just at the line, or a little below it.
Okay, now your mini gatling gun shroud should be fully compatible with your morimoto mini h1 projector, however if you plan on installing it in your 6th gen headlights with this particular shroud., the bottom of the shroud will need trimming. There is a top and bottom to the shroud due to how the posts are spaced out. When trimming, try to only cut out the bottom biggest hump, and don't "connect" the bottom most 2 "vents"..All i can say is try to minimize trimming and test fit often. In a worst case scenario, the mini gatling shrouds are only $7.50 each, and shipping is only $3.50. Also, shipping is free for any orders over 30 bucks. So don't stress too much!
Now, onto the mini graphite shrouds.
Okay what can I say...Their transparency notwithstanding, these shrouds are much better! They don't have any screws and posts to attach with, but rather, they are very compatible with the shroud centric rings that TRS sells. For some reason, i don't believe that TRS includes the shroud centric rings with the purchase, but they will throw them in for $5 bucks with your order if you ask over the phone. The rings are the black band near the top of the shroud. They make the shroud stay on super snugly, no silicone or glue required. Also, the shroud does an excellent job of being flush with the projector lens, and it conceals the lens holder perfectly. The only downside is that it will need some thorough dremeling to fit into a 6th gen accord headlight. From the top view, you can see the ring is more substantial than the mini gatling gun, which is nice, but problematic with the fairly small reflector buckets in our headlights.
In any other headlight though, and with some paint, i'd highly recommend them for ease of use and excellent compatibility. Also, I've read that they give off a pretty cool illuminated effect if left unpainted! Something to think about
Next is the elusive chrome version of the graphite shroud. Not sure if it's worth covering in detail since it is not available for sale through TRS on a regular basis..
The shroud has 4 mounting posts like the mini gatling gun, but because it is a slightly larger shroud, there is no flange fitment issues to speak of. Also of note is that the shroud has a separate clear ring on top, which is intended for "angel eye" effects. There is a small hole at the bottom of backside of the angel eye to insert an LED, very cool. Also, the angel eye can be easily removed and reattached for custom painting projects.
The mini gatling gun, graphite gray shroud, and the angel eye/chrome version of the graphite gray shroud, are all geared towards the morimoto mini h1. Being that the mini h1 is an open projector, the shrouds all fully enclose the open space between the projector bowl and the lens.
I also purchased 1 value version of the e46 r (again, over the phone, since their website doesn't allow to order just 1 shroud at a time, only pairs). This shroud is not compatible at all with the morimoto mini h1, according to TRS. If you go to TRS's website, under shrouds, under shroud centric rings, under compatibility, you will find it says
Projectors
FX-R, Morimoto Mini H1, Morimoto Mini D2S
TRS Shrouds:
Apollo, E46-R Extended, Ocular, E55-R, GTi-R
So as you see, the non extended version of the e-46 replica is not compatible at all. I would not recommend this to others, but I was able to achieve good compatibility by taking a shroud centric ring, notching it, cutting it, trimming a cross-section out of it, and installing it into the shroud backwards (normally you slip the ring onto the projector first). Siliconing the centric ring to the shroud would be good too and will be my next step. Now that i have practiced cutting up a single value version of the e-46-r, i'll probably get a full set of full quality versions, will trim those, and transfer my centric rings to them. Even then, it won't be attached to the projector quite as sturdy as it is with screws or using centric rings between normally compatible stuff. Nonetheless, I think it makes for a nicer looking end product, so i'm going with that. If you are handy and creative i'm sure you can figure it out too.
And yes, I am using the flat bottom part as the top, and trimmed the hell out of the shroud to use it as the bottom. This is specifically for best results with 6th gen headlights.

Also, note how the e-46 is not as long of a shroud. I will have to use aluminum tape to close off the open space between the projector bowl and the lens holder to keep too much light from escaping. Not sure how well it will hold up to heat though.
A picture of the mini gatling gun being test fitted (sorry for blurry pictures, these next 2 were with my cell phone, and note, the headlight does not have its bottom chrome parking light reflector installed at the time of pictures):
A picture of e46 shroud being test fitted.
This ^ is a preview of how my finished retro's will look.
Also, not sure where in my guide i should include these pictures, but pay attention to how snug the bottom of the projector assembly is to the reflector housing, at least on my depo headlights. This helps to show why shrouds that extend far back enough to cover the solenoid will need trimming on the bottom. In fact, I don't believe that there are any shrouds at all at this time that do not require trimming on the bottom.
Also, after further review and measuring, I would advise against Apollo shrouds or E55 Benz shrouds. This user used the appollo shrouds and although there was clearance after trimming the bottom, a good portion of the lends holder is left exposed because the shroud must be slid back far enough to not interfere with the "blackhouse" trim. I personally do not like this appearance when used with a 6th gen accord headlight, but your preference may vary.
http://www.6thgenaccord.com/forums/showthread.php?t=31166&highlight=mini+h1
The E55 shroud has a similarly cylindrical shape, as opposed to have the sloped profile of the e46, so it also would stick out too far into where the headlight lens and blackhouse trim would be. The ocular should be considered, if you can get past the 2 tone texturing of it.
Thank you for your time in reading this, I hope it was of use to you.
For more information on installing mini h1's into 6th gens, check out these threads.
http://www.v6performance.net/forums...ums/6th-generation-honda-accord-1998-2002/208877-morimoto-mini-h1-retrofit.html
http://www.6thgenaccord.com/forums/showthread.php?t=29234
http://www.6thgenaccord.com/forums/showthread.php?t=30914&highlight=mini+h1
6th Generation 2002 Honda Accord V6 Mini H1 Retrofit Completed!!
http://www.6thgenaccord.com/forums/showthread.php?t=31166&highlight=mini+h1
http://www.6thgenaccord.com/forums/showthread.php?t=34744
http://www.v6performance.net/forums...onda-accord-1998-2002/210393-mh1-gen6-headlights-e46-shroud-dont-agree-lol.html
These don't use Mini h1's, but they might be some good inspiration for how you may choose to blackhouse yours, what to do with strips at bottom, etc.
HID ILLUSIONZ - THE HID RETROFIT SPECIALIST
Well, hope I don't get in trouble for posting to links from other websites, and happy retrofitting!!